
Learn how to set timer on iPhone camera and enhance your photography skills. Step-by-step master timer photography for stunning shots.
Table of Contents
Introduction
The importance of getting the ideal photo has increased significantly in the era of social media and visual storytelling. Whether it’s a stunning landscape, a group selfie, or an action-packed moment, timing it right can make all the difference. In this article, we will delve deeper into the world of timer photography on iPhone to help you step up your photography game and capture moments like a professional.
Understanding The iPhone Camera’s Timer Feature
Let’s take a moment to grasp the timer feature on the iPhone camera before moving on to the practical stages. The timer allows you to set a brief delay between tapping the capture button and the actual picture being taken. This delay is incredibly useful in scenarios where manually pressing the shutter button can result in shaky or shaky shots, which in turn can result in ruining the quality of your YouTube Content or other social media content.
Sep By Step Guide: How To Set Timer On iPhone Camera
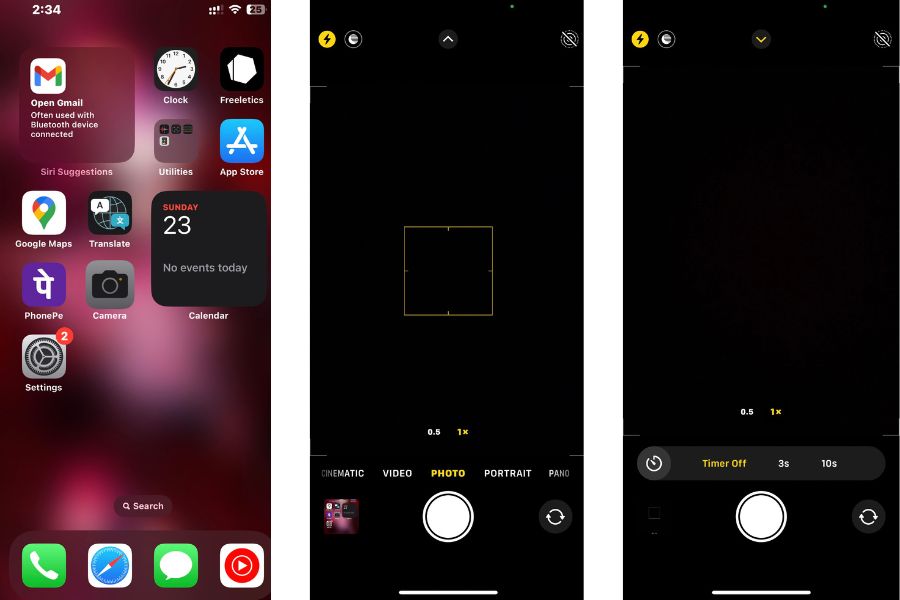
- Switching to Photo Mode: After opening the Camera App, make sure you are in Photo Mode. You can switch between photo, video, and other different modes using the icons present at the bottom of the screen.
- Accessing the Camera app: Unlock your iPhone and locate the Camera app on the Home screen. Open the Camera app by tapping on it.
- Finding the timer option: Search for the timer icon, this icon is usually located at the top or bottom of the screen which may vary depending on your iPhone model.
- Choosing a timer duration: Tap the timer icon to reveal the duration options. Common options include 3 seconds and 10 seconds.
- Setting Camera Timer: Select the desired timer duration by tapping on it.
- Composing the shot: Now that the timer is set, place your iPhone on a stable surface or mount it on a tripod. Frame your shot exactly how you want it to appear in the photo.
- Capturing the Perfect Shot: After setting up everything, tap the Capture button and the timer will start the count down. Get ready, and the iPhone will automatically take the photo after the timer expires.
Pro Tips For Mastering Timer Photography

- Tip 1: To ensure maximum stability and avoid camera shake, consider using a tripod or placing your iPhone on a stable surface.
- Tip 2: Combine burst mode with the timer feature to capture fast-moving subjects or create stunning action sequences.
- Tip 3: Perfect your self-timer selfie by finding the right pose and expression before the timer triggers the shot.
- Tip 4: Experiment with timer photography at action-packed moments, such as sporting events, to freeze moving action.
- Tip 5: Adjust exposure settings before setting the timer to get well-lit and balanced photos in different lighting conditions.
Common Mistakes To Avoid
- Mistake 1: Setting an inappropriate timer duration for a specific shot, causing photos to be rushed or missed.
- Mistake 2: Neglecting composition and framing, resulting in poorly composed shots with distracting elements.
- Mistake 3: Holding the iPhone shaky during the timer countdown leaves photos blurry and out of focus.
- Mistake 4: Neglecting lighting conditions, which can have a negative effect on the overall quality of the photo.
Taking Timer Photography To The Next Level
Once you’ve mastered the basics, you have a whole world of advanced timer techniques to explore. This includes capturing long exposure shots, time-lapse and creative use of timer intervals for unique effects. Additionally, post-processing apps and editing tools can enhance the end result of your timer photos.
Sharing Timer Photos On Social Media

To make your timer photos stand out on social media platforms, whether it be YouTube Shorts or Instagram Reels, it is essential to create catchy captions. Use storytelling and try to incorporate some humor to connect with your audience. Also, don’t forget to use relevant hashtags to increase visibility and reach a wider audience interested in photography.
Conclusion:
Congratulations! You are now armed with the knowledge to use the timer feature on your iPhone camera and capture breathtaking photos like a seasoned professional. Remember, practice is the key here, so don’t shy to experiment and discover your own unique style. Timer photography is a magical tool that can take your photography to new level by telling stories that are bound to impress your audience.
Frequently Asked Questions
- Q: Can I use the timer feature for group photos or selfies? A: Absolutely! The timer feature is perfect for capturing group photos and selfies, allowing everyone to be a part of the shot.
- Q: What’s the best way to avoid blurry timer photos? A: Using a tripod or stable surface is the most effective way to ensure sharp and clear timer photos.
- Q: Can I adjust the timer duration according to my needs? A: Yes, most iPhones offer multiple timer duration options, giving you the flexibility to suit your specific photography needs.
- Q: Are there third-party apps for advanced timer photography? A: Yes, many photography apps offer additional timer features and settings to explore.
- Q: How can I make my timer photos more artistic and creative? A: Experiment with long exposure techniques, light painting and incorporating motion into your timer photos to add an artistic touch.